
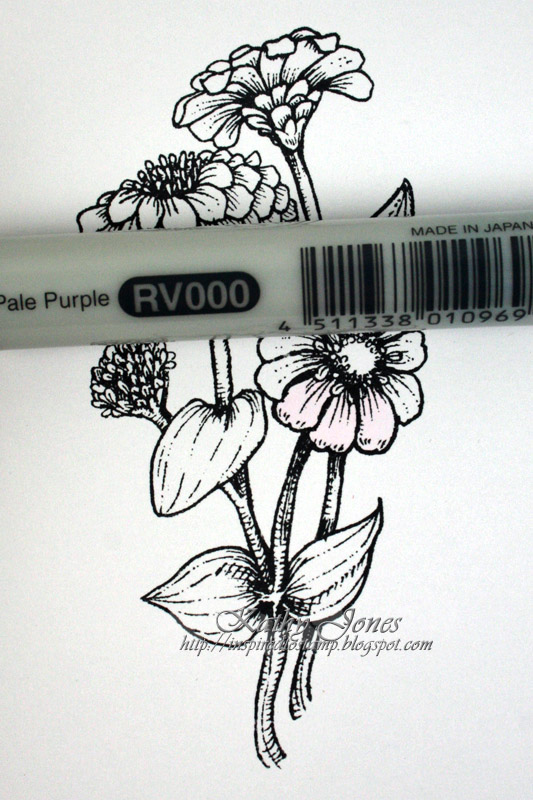
Today I've used 'Zinnias' stamp set by Flourishes Stamps as my floral inspiration! :) Stamp the image in Memento Tuxedo Black onto X-press It Blending Card and then I've coloured a few petals in RV000. I wanted a very pale base, it makes the darker colours really pop with the contrast!
Next I've flicked in a little RV52. Start from the centre of the flower and flick outwards following the shape of the petal.

Next, flick out some RV55, but not quite as far as the RV55.

To make the contrast stronger, add some RV66 to the centre part of the petals.

Blend your colours - always blend with your next lightest colour!! I decided my petals were a touch pale, so I flicked out my darker colours a bit more. If you want them lighter, leave more pale areas!

Don't forget, experimenting with different combos can result in awesome finds - try other combos and keep a copy in a sample book!!!
Here I've used the same image, but used RV10, RV13, RV14, RV17!

Too bright for you?? Tone it down with softer, dusty (more grey) colours such as R81, R83, R85.

I really liked my RV000, RV52, RV55 and RV66 combo looked and I finished all the flowers and then coloured the leaves in G40, G43 and G46. I've very lightly flicked out some B0000 around the flowers and completed my card!!

Happy Colouring!
Kathy :)Pin It
Hi Kathy, great tutorial, stunning card, tfs all your great ideas.
ReplyDeleteHugs Cheryl
beautiful card Kath! m x
ReplyDeleteWhat a stunning card. Thank you for another helpful tutorial
ReplyDeleteThis is a gorgeous card and fantastic tutoru=ial. Thanks for sharing your knowledge.
ReplyDeleteBeautiful work!! Thank you for your tutorial; I'm relatively new to Copic colouring so I will definitely give your colouring tips a go!!
ReplyDeleteTerrific tutorial, very easy to follow. I love pinks too!
ReplyDeleteBeautiful card and great tutorial x
ReplyDeleteThank you for a great tutorial! i too love bright floral's , your card is stunning!
ReplyDeleteFantastic tutorial Kathy, gorgeous card, take careX:)
ReplyDeleteThe colour combos work so well together.
ReplyDeleteLoving the new flower stamp!
Thanks for the great tutorial Kathy.
So pretty.....love it :)
ReplyDeletebeautiful!
ReplyDeleteLove the tutorial and cannot wait to get som of these beautiful stamps !
ReplyDeleteGreat tutorial and beautiful card. Flourishes flower stamps are beautiful.
ReplyDeleteLove this stamp. Your colouring tutorial is another bonus to my learning how to use copics. hugs, Aileen
ReplyDeleteFabulous tutorial, I can feel some more copic shopping is needed
ReplyDeletewonderful tutorial...have taken one class, and you ladies really help!!
ReplyDeleteKathy - thanks so much for the fabulous tutorial - your flowers turned out looking gorgeous!
ReplyDeleteLove your card! Thanks for the easy to follow tutorial. The Flourishes Stamps sets are wonderful.
ReplyDeleteWow what an awesome tutorial.. and these new stamp sets are so georgeous.!
ReplyDeleteSally
Hi Kathy,
ReplyDeleteLoved you tutorial and can't wait to follow your advice. Between the terrific "Flourishes " stamps, copic pens and your work the Zinnias look good enough to pick.