Showing posts with label Various Ink. Show all posts

Wednesday, April 30, 2014

Marbled Backgrounds with Copic Various Inks

Hi All - this week I'm going to share something fun that you could even get the kids involved with if you want to!  Though I must warn you, once you start playing this can be a little addictive, and it only gets worse once you realise all the things you can use it on!  I'm talking about marbling with Copic Various Inks of course :)


To try this for yourself you will need:
  • shaving foam (the cheaper the better) 
  • a flat surface, tray or dish that is longer than the object you'd like to colour
  • 3 or 4 colours of Copic Various ink, I used: BG15, BG34, BG49 and YG07
  • a palette knife, spatula, and maybe a toothpick 
  • and if you'd like to include a little luxury a pearlescent or metallic ink, I used Silver iZink
  • things to marble, paper, card etc.

 Spread the shaving foam onto a flat surface using a credit card or palette knife, I make sure mine is about 3cm thick so I can make a few different marbled items.  Once the surface is relatively flat, drip the various ink on top, making sure to keep each drop separate.  I like to use only 3 - 4 colours at once or you run the risk of making mud - my most successful patterns have either been all cool colours or all warm colours, BUT if you are careful you could use all the colours of the rainbow - you just won't be able to make as many prints.  


You can add a few drops of metallic or pearlescent ink for a luxury look,
a few drops = delicate swirls of metallics, lots of drops = pure luxury!  I just added a few.
The Various ink will eat into the foam a little, don't worry this won't be a problem.


Using the tip of a palette knife or a toothpick, draw parallel lines through the shaving foam.  Then rotate your project 45 degrees and repeat the process, keep rotating your project and drawing parallel lines through the foam until you have a pleasing pattern.


Place your cardstock onto the surface of the foam and lightly press down with your fingers, you need to make sure that all of the card makes contact with the foam or you will have blank spots on your design.  Some of the foam may squash around on to the back of your page - don't worry, just wipe it off later.


Gently peel the card from the surface of the shaving foam - don't worry this isn't the design that will be on your card.


Place your paper foam up onto some newspaper and use a paper towel to gently wipe to foam off the paper, I've also tried a spatula to remove the foam, but it can damage the paper surface and drag colour across the design - so I prefer a paper towel.  This step is really messy so be careful.  Once the shaving cream is removed, the design printed onto your paper will be revealed, the FIRST print will look something like this, notice the white space and clean lines.


Now if the pulled pattern left in the foam looks really pretty like this one, then grab another piece of paper (or your journal) and place it onto the foam - no need to waste it, and yes I've placed a double page journal into the foam - messy but so pretty!


Your print may look something like this, wouldn't this be an amazing and unique background for a scrapbook layout, page or a card.


Hmm - there is still a LOT of shaving cream and ink - I like to draw more lines add a little more ink and create a 2nd generation marbled print - notice this one has less white space and the pattern isn't as crisp, the lines are all softer and this second print has more of a watercolour appearance - still beautiful though!


To be honest I just keep dipping pages into the ink until either the ink or the shaving cream run out, it's messy, fun, unpredictable and completely addictive.

Wondering what else you could use this on?  Following is a brief list of things I've marbled:
  • journal pages
  • scrapbook pages
  • card backgrounds
  • chipboard letters (this looks AMAZING!)
  • ribbon - oooh this looks yummy
  • doilies
  • Easter eggs
  • notepaper
  • envelopes
  • handkerchiefs - though this was a bad idea as it's so pretty I've never used it!

I hope you've enjoyed this tutorial on marbling with Copic Various inks - if you have felt inspired to give this a go we would love to see your results over on the FaceBook page.

Back with more soon,
KatePin It

Wednesday, July 10, 2013

Art Journal #1 Creating Backgrounds

Hello and welcome to the first in our series of posts all about creating in your Copic Art Journal!  I have received quite a few questions since posting my first Copic coloured Art Journal Page, lots of people saying they didn't have the time to doodle and colour, others saying an all Copic page would use too much ink!  Well I'm here to tell you that colouring the whole page with markers isn't the only way to use Copics in your journal.  To give you all a little head start, today I'll show you 5 simple techniques that you can use to create Copic backgrounds in your journal and then I will be creating a page using these techniques to show you how it could look.  I am working in my fabulous X-Press It Copic Blending Journal as it is created with Copic blending card and perfect for Copics and journaling!


Technique 1: Spritzing with Copic Ink 

You can do this in one of 2 ways, add Copic Various ink to a mini mister and spritz (the colours will be quite strong and you will use a fair bit of ink) or what I've done here, pick a strong colour (eg Black 100) and add 3 drops to a mini mister bottle followed by 3mL of Copic Colorless Blending ink (if you look on the side of the Various reinkers it is marked in mL to make it easy).  If you push the pump nozzle quickly you get a fine even mist, if you push slowly you get a splattered look, you can see both below.

Spritzing


Technique 2: Stencilling  with Copic Ink 

Use the same ink and blender mixture as from Technique 1 and use this to mist through stencils - don't spray too close to the stencil or liquid can seep underneath and make sure you are working in a well ventilated room.

Stencilling

Stencilling


Technique 3: Copic Various Ink drips

This is one we usually try not to do, but today you are going to tilt your card and add drips of Copic Various ink straight from the bottle, the resulting colours are quite strong, so use this sparingly.

Drips 1


Technique 4: Copic Various Ink drops

Something else we usually avoid, drip Copic Various ink onto a non-stick surface, add a drop of Colorless Blender  to each drop and plop your project right onto the spots face down, you will create uneven blobs of colour.

Trust the Mess Copic Journal Page 4 wm


Technique 5: Stamping with Found Objects

Grab any non-porous object (plastic, glass or china etc) use the chisel tip of your Copic marker to colour the surface, spritz your card with Colorless Blender and then firmly press the inked part of your object onto the wet card.  More blender = wetter card = more wicking of the ink, where as less blender = crisper image.  You can try this with jars, lids, leggo, toys etc.

Trust the Mess Copic Journal Page 10 wm

Found object stamping

and these are the techniques I just showed you, being used to create my Art Journal page ...

 Mask edges of page with low tack tape, spray page with your favourite sparkly spray, let dry then then spritz page with Copic ink (Black 100 + Colorless Blender) - see you can combine sparkles and Copics!

Trust the Mess Copic Journal Page 3 wm

Use same Copic ink in mister bottle to add some stenciled words or patterns.

Trust the Mess Copic Journal Page 3 wm

Add drips of Various ink (BG15) directly to the page and add drops of ink as described previously (I used BG49 and BG15).

Trust the Mess Copic Journal Page 6 wm

Use jar and plastic lid to add stamped impressions, I coated objects with E29.

Trust the Mess Copic Journal Page 6 wm

Use old Copic Multi Liner Brush marker size M to stencil on some words, the stencils are hard on the marker nibs so don't use your best brush marker for this.

Trust the Mess Copic Journal Page 6 wm

Trust the Mess Copic Journal Page 6 wm

Use 4B pencil to add shadows to lettering.

Trust the Mess Copic Journal Page 12 wm

Stamp Flourishes images from Magnolias and Hydrangea sets, using Mememto ink in Bamboo Leaves & Rich Cocoa and colour with pencils.

Trust the Mess Copic Journal Page 12 wm

Remove masking tape - there will be gorgeous little runs and specks of colour.

Trust the Mess Copic Journal Page 12 wm

and you have created something like this, if you look you can see all of those techniques used on this one page..

Trust the Mess Copic Journal Page 12 wm

I hope you have a great time trying these techniques for yourself, remember art is supposed to be fun so dive in and give Copic Art Journaling a go!

Kate
Enhanced by Zemanta
Pin It

Wednesday, February 20, 2013

Copic Backgrounds using Colorless Blender

I'm so excited to share my first post for Copic Oz with you all, my tutorial this week is on creating Copic Backgrounds.  Now any of you who already know me from my blog, know I LOVE backgrounds, I love making them, I love using them, I just love everything about them, so this topic was perfect for me.  My biggest problem was narrowing down what to show you all, there are just so many options, I decided to stick to backgrounds that use the Colorless Blending Fluid in some way - I hope you enjoy these and don't forget we would love to see how you use our ideas, so leave a link to your blog post in the comments section if you have used this technique on something you have created.

Grunge Splatter Background

For this technique you will need several colours of Various Ink, Colorless Blending Fluid, a mini mister, a non-stick craft sheet or waxed baking paper and glossy or coated cardstock.

Drip about 5 drops of each colour (I used V28, V06, V17) onto the craft sheet, making sure the droplets no not touch.

Add a little of the Colorless Blending Fluid to a mini mister, and spritz ink on craft sheet  - this is very important, if you forget to spritz you will end up with 'spots' of intense colour.  Spritzing ensures the colours move and blend a little.

Make sure you only spritz a little, add too much and your colours will be very pale.  As a rough guide - I used 4-5 pumps of the mini mister nozzle.

Place card glossy side down, onto the ink drops, then press down gently with fingers to make sure you have contact.   I like to then drag the card through the ink to pick up the colour.

 Turn card over to check the coverage you have achieved, you may like to leave the white areas, I prefer to keep swiping the card through the remaining ink until most of the white is covered.

 When your card looks something like this you are ready for the final step.

Spritz some of the Colorless Blending Fluid onto the tips of your fingers.

 Then 'flick' the blending fluid onto your card, the more fluid on your fingers the larger the droplets, for finer droplets either flick with more force or use less blending fluid.  I like to have a mix of large and fine droplets.  Wait about 1 minute for the pattern to fully develop before deciding if you want to add any more blending fluid.

I consider my background complete when it looks a bit like this. 

You could die cut this to use on a project, use it as a layer or even stamp directly onto this using an oil based ink pad like Archival ink, to create a simple but stunning card.  This technique can also be used on clear acetate for fabulous results and looks simply beautiful when used as an accent panel.

Now, my next background is fun - heaps of fun and there are so many ways you can adapt this idea, though you will need a Copic Airbrush. I currently use the X-Press It Air Compressor Auto - which I adore, though this technique will also work with any of the Copic Airbrush kits.

Stencil Background using the Copic Airbrush

For this technique you will need several colours of Copic Marker, Colorless Blending Fluid, a mini misting bottle, a Copic Airbrush, a stencil or template and X-Press It Blending Card.

 Start by airbrushing your palest colour (which in this case was YR09) onto the blending card - don't cover the card, just add colour in patches like I have.

Then add your deepest colour (R37) with the air brush, overlapping the colours a little - you should still have some white areas at this point.

Next add an intermediate tone (R17) again overlapping colours, this helps any visible lines or edges disappear.  You should still have a little white.

Finally add a bright, strong colour (RV09) filling in all remaining white areas and use this same colour to blend any lines, patches or edges between the other colours.  I know this is bright, but you will find that the brights and dark colours work best for this technique.

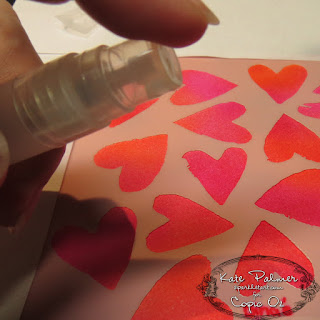
Fill a mini mister with  Colorless Blending Fluid and tape a stencil over your background, make sure your stencil or mask will not move about during this next step.

Carefully spritz the airbrushed card with the blending fluid - very lightly.  You can always go back and add more later, but if the liquid seeps underneath the stencil then your design will be ruined.  Lightly spritz, then wait for a minute to see if more blending fluid is needed, if it is, lightly spritz again.  Very rarely, will you need to spritz a piece more than twice.

 No need to wait, you can carefully remove your template from the card right now - and you will have a wonderful background with a pattern or design all in coordinating colours.
I'm hoping you have as much fun making these backgrounds as I did and that you have enjoyed my first post for Copic Oz.

Kate Pin It