Showing posts with label Colourless Blender. Show all posts

Wednesday, October 30, 2013

Copic Journal Cover

Hi again - today's project has quite a few steps but the results make it completely worthwhile!  Now a few of you may be familiar with the work of amazing  Polish artist Anna Dabrowska - better known as Finnabair, well today I am taking inspiration from Finnabair's unique complex style and creating a cover for my new Copic Journal.

You will need to gather some materials to embellish your journal cover: metal, plastics, embellishments, papers, lace, charms, wood, chipboard - whatever you would like to incorporate onto your design.  I am using my X-Press It Blending Journal, a variety of lace, Chromacryl white acrylic paint, chipboard shapes from FabScraps and a variety of brass charms and paper flowers.

**Normally it is recommended that you apply your Copics first BEFORE paint, pencil or any other mediums, so they won't become clogged. Before you start, you do need to be aware that when using your Copic Markers on some surfaces you need to understand the nib may become blocked by repeated use over paint and you accept that you will need to periodically replace the nib. It is a good idea to have a few Copics that you use ONLY for mixed media work.**


Paint the journal cover with the white Chromacryl acrylic paint - I used 2 coats allowing each to dry before continuing.  Once dry use the fabulous TripleTac glue from X-Press It to adhere your embellishments to the journal cover - allow this to dry thoroughly before continuing.  
This is what mine looks like.

Once dry cover everything with white Chromacryl paint and leave to dry.  You can add a little texture paste for extra interest at this point if you like.


Spray with your favourite sparkly sprays and let dry (this saves a little Copic ink as it adds a base layer of colour, it also adds a little bit of sparkle to the final project).  
Using a Copic airbrush spray BG34 over your cover to colour any light/white areas.

Spray YG25 to about 1/4 of the cover - this can either be randomly or you can choose to colour individual elements.

Still using your airbrush, add V04 to a few places and colour some of the elements eg: flowers or bird - this adds a beautiful contrast to the greens and blues

Add BG49 to darken the colours.

Now this is where things get really interesting!  Using the special properties of Copics and the Copic Blender you can achieve some exciting special effects.  

Before adding any final colours, use a stencil and the X-Press It Clear Gel Glue to apply a design to some of the areas without embellishment.  I also used the Clear Gel Glue to cover some individual elements to highlight them, leave this for several hours or until completely dry.

This results in gorgeous shiny areas (keep reading to see why this is an important step).


Spray BG09 around the edges of the cover - darkening the edges draws your eye to the more colourful area in the centre.  Go ahead and use your airbrush to spray right over the top of the glue design.

Add E47 to the edges and to some of the central designs, again this helps draw the eye.

The final colour E49 is only sprayed on to the very edges, and to the central frame - go ahead and spray this well, getting into all the nooks and crannies.

Use the Copic Blender for the next steps - the special effects!

Using the blender brush tip, remove the excess colour from the top of the gel glue elements (make sure to scribble to colour off your blender in between) - this will reveal the original colour underneath which is paler, creating patterns which POP!

Then use the chisel nib to remove colour from the highest points of some of the textured embellishments eg: frame, bird etc, this will reveal the colour underneath and leave yummy darker colour around it (using this flat nib ensures you only touch the very top of the design - resulting in a beautiful colour contrast - just don't press too hard!).

As a final step flick a little of the Copic Various Blending ink onto your project (I add a few drips onto my fingers and just flick this on) - this will add just a little more texture and interest to the final piece.

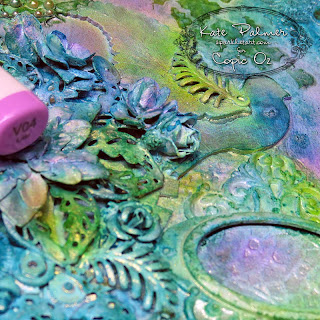
 Once all the colour is dry and you have finished removing colour using the Blender your project will look something like this up close, aren't those colours amazing - the Copic ink even blends and layers over paint!

and this is what my finished journal cover looks like....


Products used on this project:

  • Copic Markers: BG09, BG34, BG49, V04, YG25, E47, E49 and Colorless Blender
  • Copic Air Compressor
  • Copic Colorless Blender Various Ink
  • X-Press It: Blending Journal, Clear Gel Glue and TripleTac Glue
  • Chromacryl White Acrylic Paint
  • FabScraps chipboard shapes, lace, watch parts and other embellishments (metal and acrylic)
  • Optional - your favourite sparkly spray as a base - for a matt finish omit this


I just love the amazingly vibrant results achieved with the Copics on this project and the special effects achieved with the Blender make it just that bit more special.  I hope this inspires you to have a go at this technique for yourself, I can promise it is loads of fun and the results as you can see are fairly impressive.

I'd love to hear what you think of my journal cover,  I'd also love to see how you've decorated your Copic Journal covers so why not post a photo of your decorated X-Press It Blending Journal over on the Copic Australia Facebook page.

Kate

Pin It

Wednesday, September 4, 2013

Using Molotow Paint Markers with Copic On Journal Page

molotow paint marker one4allHi All -  many Copic users often want to know whether they can use Copics with other mediums – the answer to that is YES (but its important that you understand how to use other mediums so you don’t damage your Copic). One of my favourite mediums is the Molotow One4All Paint Markers.

The One4All is a versatile acrylic based paint marker, which has a highly pigmented, solvent-free, hybrid-paint and just like the Copic Markers they are refillable and the nibs can be replaced.

So a few important things to note when combining your Copic Markers with other mediums, especially paints.  
  • The nibs on Copic Markers are porous - this allows the ink to flow out of the nib - this also means that other mediums can be sucked into the nib like a sponge. Particularly harmful to the nibs are acrylic paints, chalky substances and glitter particles.  
  • On sealed or glossy surfaces your Copics will appear several shades lighter than they do on paper (as they can't be absorbed) so always choose a colour several shades darker than you would normally use.
To be able to use your Copic Markers with mixed media, you will need to do one of following things:
  1.  Apply the Copics first BEFORE paint, pencil or any other mediums, so they won't become clogged.  Works best when only adding small amounts of paint marker.
  2. Have a few Copics that you use ONLY for mixed media work, and understand the nib may become blocked by repeated use over paint and you accept that you will need to periodically replace the nib.
  3. Apply the Copic marker AFTER all other mediums and AFTER you have sealed the page with a gloss sealant.  This is my favourite, it allows for a translucent glaze of colour and is a lot like working with Copics on acetate.  For hard lines apply colour direct from fine or chisel tip, for softer lines I like to use either my Copic Blender to apply the colour or the brush tip on the marker (layering light next to dark until colour fades away) - think 'fade to white' technique when applying like this.

Now before I show you my Molotow One4All  and Copic journal page, I thought I'd show you a few examples where I have used the Molotow markers with Copic Markers on cards, for those of you who aren't journalers.

Adding the glint of reflective light into the eyes of your Copic Coloured images,
I've used the White 1mm Molotow for this.


Adding reflections to shiny objects ie: Glass, metal, water
I've used the White 1mm Molotow for this.


Stamp Flourishes Orchids stamp onto vellum using Memento Tuxedo Black ink.  Flip image over and colour reverse side with Molotow Markers (let dry), I used 4mm white and 2mm Grasshopper.
Then flip and colour stamped side using Copic Markers, I used: G48, R81, RV55, Y32 & Y35.
This really makes the image pop on printed or coloured card, and I love the way you can see the background designs through the vellum.


Now for something a little more involved, this is the most beautiful way I know to combine Molotow One4All Paint markers and Copics, while keeping your Copics safe from paint.    I have used:
  • Molotow Paint Markers: 201 Lilac Pastel, 010 Lobster, 161 Shock Blue Middle223 Metallic Black, 160 Signal White (extra Fine) & 180 Signal Black (extra fine)
  • Copic Markers: E47, Bv13, Copic Colorless Blender, B91, B95 & B99
  • Atyou Spica: Clear and Turquoise
  • Gloss Varnish or Sealer

Technique

Glue paper, tissue etc onto journal page and coat with Matt Medium, when dry, draw image in pencil.

Owl 004 a wm

Apply One4All Paint from 2mm markers in the following method - apply paint directly to image, while wet, smear with finger to create softer effects and translucent layers of colour.  
NB: This won't work on unsealed paper.

Smear with finger - 1

Continue to apply colour with this method until the image is coloured to your satisfaction - mine looks like this.
Owl 008 a wm

Using 1mm Signal Black Molotow, add detail and outline to the image.

Owl 011 a wm

Use 1mm Signal White Molotow marker to add highlights (eg: to the eyes)

Owl 020 a wm

Add shading, a hint of glitter with Atyou Spica pens and a quote using Molotow 2mm and 1mm paint markers on the facing page.  Seal with a gloss varnish.

Glittering Eyes 3 b wm

Add Copic Markers over the top of the gloss varnish (this forms a layer like plastic, protecting your markers from whatever is underneath), apply the darker marker first and blend out with either lighter colours of Copic marker or your Colorless Blender.  
Once all my Copic layers have been applied, my finished page looks like this, much deeper colour.


Now it's really difficult to show the amazingly gorgeous glaze effect achieved from the Copic Markers, but I'll try - compare the before and after photos.

Before
Owl 020 a wm

After

and closer, you can see each individual layer - even the tissue underneath.  Honestly you will have to try this yourself to see how amazing it looks!

I hope this has given you a few ideas about how you can use your Copics and Molotow paint markers together,

KatePin It

Wednesday, July 10, 2013

Art Journal #1 Creating Backgrounds

Hello and welcome to the first in our series of posts all about creating in your Copic Art Journal!  I have received quite a few questions since posting my first Copic coloured Art Journal Page, lots of people saying they didn't have the time to doodle and colour, others saying an all Copic page would use too much ink!  Well I'm here to tell you that colouring the whole page with markers isn't the only way to use Copics in your journal.  To give you all a little head start, today I'll show you 5 simple techniques that you can use to create Copic backgrounds in your journal and then I will be creating a page using these techniques to show you how it could look.  I am working in my fabulous X-Press It Copic Blending Journal as it is created with Copic blending card and perfect for Copics and journaling!


Technique 1: Spritzing with Copic Ink 

You can do this in one of 2 ways, add Copic Various ink to a mini mister and spritz (the colours will be quite strong and you will use a fair bit of ink) or what I've done here, pick a strong colour (eg Black 100) and add 3 drops to a mini mister bottle followed by 3mL of Copic Colorless Blending ink (if you look on the side of the Various reinkers it is marked in mL to make it easy).  If you push the pump nozzle quickly you get a fine even mist, if you push slowly you get a splattered look, you can see both below.

Spritzing


Technique 2: Stencilling  with Copic Ink 

Use the same ink and blender mixture as from Technique 1 and use this to mist through stencils - don't spray too close to the stencil or liquid can seep underneath and make sure you are working in a well ventilated room.

Stencilling

Stencilling


Technique 3: Copic Various Ink drips

This is one we usually try not to do, but today you are going to tilt your card and add drips of Copic Various ink straight from the bottle, the resulting colours are quite strong, so use this sparingly.

Drips 1


Technique 4: Copic Various Ink drops

Something else we usually avoid, drip Copic Various ink onto a non-stick surface, add a drop of Colorless Blender  to each drop and plop your project right onto the spots face down, you will create uneven blobs of colour.

Trust the Mess Copic Journal Page 4 wm


Technique 5: Stamping with Found Objects

Grab any non-porous object (plastic, glass or china etc) use the chisel tip of your Copic marker to colour the surface, spritz your card with Colorless Blender and then firmly press the inked part of your object onto the wet card.  More blender = wetter card = more wicking of the ink, where as less blender = crisper image.  You can try this with jars, lids, leggo, toys etc.

Trust the Mess Copic Journal Page 10 wm

Found object stamping

and these are the techniques I just showed you, being used to create my Art Journal page ...

 Mask edges of page with low tack tape, spray page with your favourite sparkly spray, let dry then then spritz page with Copic ink (Black 100 + Colorless Blender) - see you can combine sparkles and Copics!

Trust the Mess Copic Journal Page 3 wm

Use same Copic ink in mister bottle to add some stenciled words or patterns.

Trust the Mess Copic Journal Page 3 wm

Add drips of Various ink (BG15) directly to the page and add drops of ink as described previously (I used BG49 and BG15).

Trust the Mess Copic Journal Page 6 wm

Use jar and plastic lid to add stamped impressions, I coated objects with E29.

Trust the Mess Copic Journal Page 6 wm

Use old Copic Multi Liner Brush marker size M to stencil on some words, the stencils are hard on the marker nibs so don't use your best brush marker for this.

Trust the Mess Copic Journal Page 6 wm

Trust the Mess Copic Journal Page 6 wm

Use 4B pencil to add shadows to lettering.

Trust the Mess Copic Journal Page 12 wm

Stamp Flourishes images from Magnolias and Hydrangea sets, using Mememto ink in Bamboo Leaves & Rich Cocoa and colour with pencils.

Trust the Mess Copic Journal Page 12 wm

Remove masking tape - there will be gorgeous little runs and specks of colour.

Trust the Mess Copic Journal Page 12 wm

and you have created something like this, if you look you can see all of those techniques used on this one page..

Trust the Mess Copic Journal Page 12 wm

I hope you have a great time trying these techniques for yourself, remember art is supposed to be fun so dive in and give Copic Art Journaling a go!

Kate
Enhanced by Zemanta
Pin It