Tuesday, November 30, 2010

Skin Colour and EXCITING DATES FOR 2011!!!

Skin Colour Combinations is amongst the most asked questions I get as a Regional Instructor. As you know I looove colouring these gorgeous little people, and so skin colour is very important!

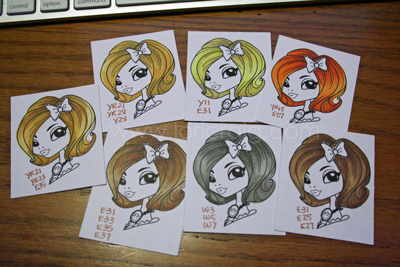
I have made this sample page for you to have a look at! It includes skin colour combinations from very light skin colour to dark skin tones. Please click on the image to enlarge the page!

When I colour skin I always start with my lightest colour first then pay particular attention to where my light sourse is coming from, so that I know where to add my darker colours. I then always go back to my original lightest colour to blend out my skin. I almost always finish off the face with a tough of R20 to add some blush to the cheeks!

Here is another sample of a gorgeous CC Design person that I have coloured using a lighter skin colour combination!

This project is part of a whole Copic Party Theme which has just been published! You can see the whole 7 page Copic Party in this months issue of Simply Cards Magazine!!!!


WE HAVE RELEASED DATES FOR CERTIFICATION AND THE NEW COPIC PROJECT PROGRAM FOR 2011!!!

We are excited to announce that dates for Copic Certification and the Copic Project Program have been released for early 2011. Additional dates (including dates for Intermediate Certification) will be released next year so keep checking www.copicoz.blogspot.com
For more information about the Copic Project Class see: http://copicmarker.com.au/certification/
Brisbane:
Monday 21 February - Copic Project Class – taught by Kathy
Sydney:
Saturday 12 March – Copic Beginner/Standard Certification – taught by Mandi
Sunday 13 March – Copic Project Class – taught by Mandi
Melbourne:
Saturday 26 February - Copic Project Class – taught by Mandi
Saturday 5 March – Copic Beginner/Standard Certification – taught by Mandi


Happy Colouring....Mandi xxx


Pin It

Tuesday, November 23, 2010

Skin Colour and NEW Challenge #5

NOW FOR THE NEW CHALLENGE!!!!

The new challenge for this month is "CHRISTMAS WITH A TWIST!"

You need to create a project with a Christmas theme....with an added twist! Now the twist may be an off the page project, or perhaps a card using nontraditional Christmas colours, or perhaps a twisted Christmas stamp! I will leave the twist part up to you! However, please make sure that this is still a COPIC based project!

Here is my little twisted sample!

Is there a Prize?: YES!! This month it's a Copic Swatch Book and a Mist It Spray!!!


Who can play?: This challenge is open to EVERYONE, including international!

How do you enter?: Use the inlinkz below to connect to your blog or online gallery and upload it prior to 6pm Monday 27th December 2010, Australian EST (4am USA EST)!!! The winner will be announced on Tuesday 28th December 2010!!!!

Good Luck...and Happy Colouring!!!
Mandi


Pin It

Feathering Winner!!

Hello Everyone!!!  It's that time again when we announce the winner of this month's CopicOz challenge!!!  This month I challenged you to feather and we did have some BEAUTIFUL submissions this month!!!  A HUGE thank you to all who participated!!!

Without further ado, the winner this month is......

Honourable mentions this month go to......
Alexis - how beautiful is the feathering on these feathers, gorgeous!

Darelle - soft and delicate colours and you can't see where one colour ends and the next begins!

And Mel with this stunning creation - check out that feathering, what a gorgeous combo!!!

Congratulations Lorraine!!!!  Please Email me with your postal details so we can send your prize to you!!!

Don't forget to pop by tomorrow because Mandi will have another fabulous challenge for you!!!  :)

Hugs
Kathy  :)
Pin It

Wednesday, November 17, 2010

Testing Paper

Like my previous post on Testing Ink, testing paper is equally important!  Not all papers are created equal - some will bleed and some won't blend.  You don't want to spend time working on a beautiful piece of work only to have it turn ugly!!

So - what makes a good paper for Copic Markers?  You want a paper that won't feather (spreading across the top - it's OK if it bleeds through the back), that won't over saturate too quickly, will blend colours well and the colourless blender will be able to move ink.  If it doesn't pass these tests, then you won't get the results you are looking for!

The first thing to do when testing paper is to draw a circle with your multiliner (if you don't own a multiliner, then stamp an image in ink you know is safe such as Memento).  Also ensure that you have clean scratch paper under your work - it is perfectly normal for colours to bleed through the back!

Next take a blending pair of colours - today I've chosen R22 and R24 - and use the lightest of your blending pair (in my case R22) to colour in the shape by colouring in circles.

Is your colour starting to move outside the line??  If so, this is not a good paper for you!!!  If your colour is staying put, then it's passed the first test!  I'm using X-press It Blending Card and I know the colours will not move on this paper (it doesn't count if you accidentally colour outside the lines LOL!!).

Next take the darker of your two colours - in my case R24 - and flick in the colour from one side.

On a good paper the colours will start to blend without any work, like this one!  To blend your colours, go back with your lightest colour and lightly blend where the two colours meet, but working in circles and flicking out to the paler side.

Did your colours blend??  Awesome - your paper has now passed the second test!!  :)  As you can see my two colours have blended beautifully together!  :)  The third thing you want your paper to do is to have the colours move when you apply your Colourless Blender - by applying the broad chisel nib to the centre of your circle, you colour should move.

If your paper allows the colour to move with the Colourless Blender, then your paper has then passed the third test!!

I have been asked a lot recently if paper type really matters and instead of explaining how you can get hugely different results, I made up these samples (coloured exactly the same) which now live in my sample book......

 This is plain old Tablex 200gsm paper that I found at a stationary store......YUK!!!!

Next is some Canon 250gsm (uncoated - not gloss) that was also found at a stationary store.


Now this one was ok with some colours (although in my opinion they don't blend particularly well), but on the Greens, Blue Greens, Greys and Reds they did bleed outside the lines.

Lastly I used X-press It Blending Card and got perfect results with every single colour, not to mention the colours are better and smoother too!!  :)

What a huge difference paper can make!!!!  :)  Hope you've enjoyed today's tutorial and see you on Tuesday for the winner of the CopicOz Feathering Challenge --- you still have time to play along and win!!!!  :)Pin It

Wednesday, November 10, 2010

Have a Good Hair Day!

all-samples_lcraig.jpg

Hello. Thank you for checking in with Copic Oz today. My name is Lori Craig. I am a Copic Certification Instructor in the United States. I had the incredible pleasure of meeting many of you when I was in Australia earlier this year for certification classes in Sydney and Melbourne. A few of you may know me from www.splitcoaststampers.com, where I work full-time. I'm excited to be a guest author for the Copic Oz team this week.

Hair is one of the tricky things I'm often asked about in Copic classes, and this is what I call a good hair day! Lily from The Greeting Farm makes an excellent hair model, don't you think? Hair color, whether in your very own stylist chair or on cardstock can be intimidating, so I've put together a few different color combos that work well.


yr15_e07-copy.jpg

Red head...

y11_e31-copy.jpg

Beach Blondie...

yr21_yr28_y28-copy.jpg

Classic blond...

e31_e33_e35_e37-copy.jpg

Brunette

w3_w5_w7-copy.jpg

And, finally, a gray beauty.

Many thanks to the Copic Oz team for asking me to stop by. I hope I've given you some new perspective today. I would encourage you to keep a sketch book and experiment with hair color options of your own. Make sure you make note of the color combinations that you use. Over time, you'll enjoy looking back at the sketches for reference and new inspiration.Pin It

Tuesday, November 2, 2010

Intermediate Certification and an EXCITING ANNOUNCEMENT!

Hi Everyone,

Well I am back .... I had a great trip to Chicago – where I met up with Marianne and the rest of the amazing Copic Team.


(Debbie Olson, Lori Craig, Marianne Walker, Sherrie Siemns, Bianca NDM, Sharon Harnist, Jenn Balcer, Me, Jennie Black and Colleen Schaan)


I completed the Intermediate Certification with Marianne .... and now can’t wait to teach the Intermediate Certification Program in Australia in 2011.

Intermediate certification will be a fantastic 1 day program covering colour theory, light and shade and much more. More details will be posted in 2011 - please keep checking copicoz.blogspot.com
I am also so excited to announce....
In addition to intermediate certification we will be launching the inaugural Copic Project Course. This will be a one day program, focusing on 3 amazing Copic projects. This will be an amazing opportunity to create 3 completed Copic projects, covering a range of mediums and incorporating a variety of techniques.
More information and upcoming dates and locations will be posted in 2011.
Mandi-Lee
xxx
Pin It