Wednesday, November 27, 2013

A Very Copic Christmas

Hi Kate here and this month I'll be showing you two very quick and simple Christmas projects that you can complete in under 30 minutes - yes that's both in under 30 mins with the help of a Copic ABS (Air Brush System).

The first project is some Copic decorated wrapping paper, this is a wonderful way to re-use the brown or plain paper that you receive during the year, wrapped around other items.  The same technique will work on paper, tissue and even cellophane - so save all that wrapping and create your own Copic coloured decorator papers.


For this project you will need:

  • Copic Sketch Markers in coordinating colours (I used: B79, RV66  & BG57)
  • Copic Air Brush System
  • Stencil or template (I used a punched snowflake)
  • Recycled paper, tissue or cellophane
  • Length of white ribbon
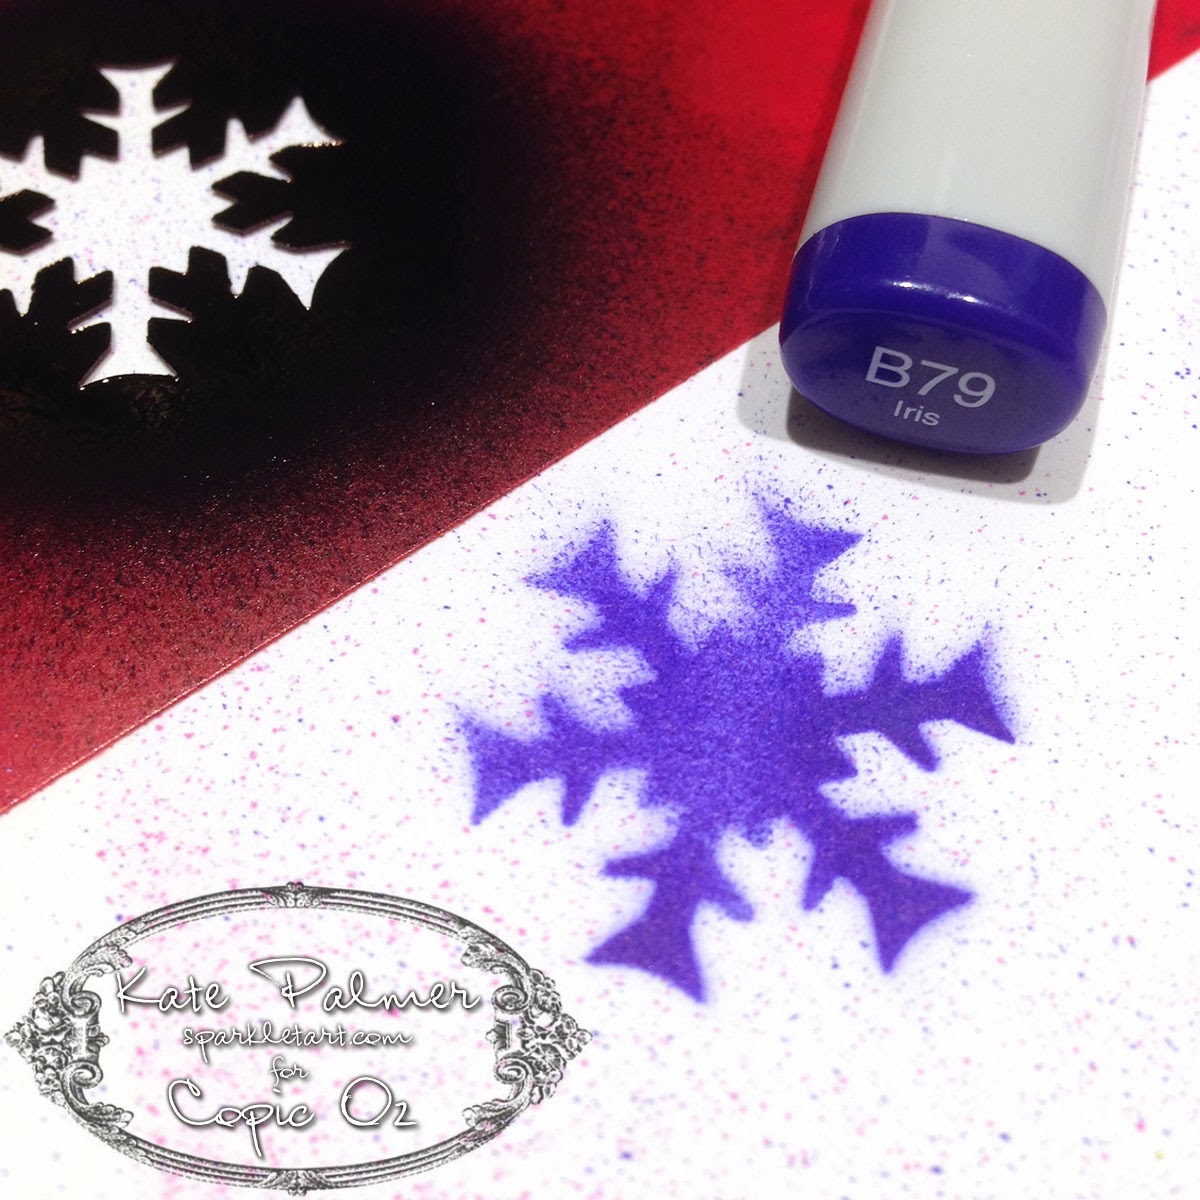
Begin by laying the stencil flat onto your paper and lightly spraying on the first colour (RV66) with the airbrush.  Move the stencil around, creating as many little Raspberry snowflakes as you like.


At this point you can continue to use the snowflake with the next colour (BG57) or you can use a different shape stencil for some variation.  Add as many Jasper (Blue Green) snowflakes as you like - just remember to leave some room for the 3rd colour.


Time to add the final colour, now B79 'Iris' is one of the stronger Copic colours, so spray this lightly and I didn't add as many snowflakes of this colour to my project, so as not to overwhelm the other colours.  Once finished adding snowflakes, put your paper aside to dry - this won't take long!


Now you don't HAVE to colour the ribbon to match - I just thought it was a cute accent.  For those of you who have coloured ribbon with your Copic Markers before you will know how long this can take and how much ink is used.  Well I'm happy to report that not only does colouring ribbon with the Copic ABS use much less ink, it's also loads faster and the results are beautiful!  All I've done here is airbrush the B79 onto the ribbon, I've added more ink to one side than the other so I will get a two-toned effect to the ribbon when I tie it.


And here is my Copic decorated wrapping paper and ribbon, cute, customised and quick!


Things to note:
  • When using small stencils like this one there will be some overspray (where the Copic ink sprays over the edge of the stencil onto your project), if you really don't want this, protect your project with scrap paper as you spray.  I didn't as I like the extra patterns it adds to the final piece.


For my second project I'm creating something slightly fancier - a stunning custom Christmas bauble. This really isn't as difficult as you may think - just don't drop it!


For this project you will need:


  • Copic Sketch Markers in coordinating colours (I used: B79, RV66  & BG57)
  • Copic Air Brush System
  • Snowflake Die
  • Mask It - masking film
  • Clear glass or plastic bauble
  • X-Press It Clear Gel Glue
  • Silver Glitter
  • Sticky tape and tissues

Begin by using your favourite die cutting system to cut some snowflakes from a sheet of Mask It film - this film has a sticky layer on one side making it a removable adhesive.  Today we won't be using the die cut shape, but rather the surrounds!   I cut 3 negative shapes to use - you may like to use more.


Remove the backing layer from the Mask it shapes and adhere the sticky negative shapes onto the bauble, you may need to cut them in 2 to fit onto the rounded surface - I also overlapped the pieces a little.  I then used sticky tape to attach some tissues to protect the rest of the bauble and keep it from being coloured.  Using my airbrush I have added a layer of BG57 as a base colour.


With the mask still in place add some of the RV66 - don't colour the whole thing, just add this to a few edges and maybe a little in the centre - remembering to leave space to add the 3rd and final colour.


Go ahead and add the last colour, I'm using a particularly dark colour B79 so am adding only a little!


Remove the tissue and repeat this whole colouring process, around the bauble until all of your die cut shapes have been coloured.


Remove the tissue and the Mask It and your project now looks something like this.  You might choose to leave it like this is you don't like glitter.


For my final step I have dribbled X-Press It Clear Gel Glue around the top of the bauble and let it drip down the sides a little - now this is very thick and needs some encouragement to drip.


While glue is still wet shake your favourite colour of glitter over the top and then hang somewhere safe and leave overnight to dry.  Once dry brush off any excess glitter and it's ready to use.


Wishing you all a very Merry Christmas (just a little early) and a wonderful new year...

Kate 

Enhanced by Zemanta
Pin It

Wednesday, November 13, 2013

Santa is Coming!


Only 42 sleeps to go until Christmas!!  For many of us that is a frightening statement, so it's time to kick those creative genes into gear and get our Christmas cards made and posted so we aren't madly doing them at the last minute!!

Today I've used a fun set by Flourishes called Sweets of the Season because I just adore these sweet candy canes!  They are such a good size and perfect for cards, ornaments or even decorating little gift boxes!

Start by stamping your canes in Memento Tuxedo Black onto X-press It Blending Card and lay down a base of R32 on every second stripe on the canes.

 To give your canes a curved appearance, add shading to each side of the stripe with just a touch of R35.

I'm not blending as I go this time because red can be tricky to use and it won't bleed outside the lines if you allow your paper to dry a little in between layers of colour.  Deepen your shading with R37.

Now the canes are starting to have a curved look!  Blend with R35 and R32.  You don't need to blend a lot and often just a dot of colour will work well with the X-press It Blending Card.
 

The canes are looking good, however I like lots of contrast so I'm deepening that shading even more with R39.


Now lets get started on the holly!  Lay down a base of G20 and add shading with G21 and G24.


Deepen along the veins with G28.

Lightly blend with the next lightest colours from above!

For the holly I've used a different pair of reds - R24 and then a dot of R29 for the shading.  You certainly don't need much in such a small area.


For the bow I've chosen golden yellow, starting with Y21 - one of my favourite, most used colours!

Next I've shaded with Y26, under the loops of the bow, under the holly and where the ribbon twists are always going to be darker.

Deepen with Y28.

Now I'm quite happy with the way this is looking, however I've decided that although the red parts of the candy cane look beautifully curved, the white isn't so I've used a little C1 on each side of the canes just to add a little shading.

And there you have it!  Fun and beautifully coloured candy canes just waiting to adorn your project!  I've made a card, what projects could you make with these candy canes??  :)

Hope you've enjoyed today's tutorial, thanks for visiting!Pin It

Wednesday, October 30, 2013

Copic Journal Cover

Hi again - today's project has quite a few steps but the results make it completely worthwhile!  Now a few of you may be familiar with the work of amazing  Polish artist Anna Dabrowska - better known as Finnabair, well today I am taking inspiration from Finnabair's unique complex style and creating a cover for my new Copic Journal.

You will need to gather some materials to embellish your journal cover: metal, plastics, embellishments, papers, lace, charms, wood, chipboard - whatever you would like to incorporate onto your design.  I am using my X-Press It Blending Journal, a variety of lace, Chromacryl white acrylic paint, chipboard shapes from FabScraps and a variety of brass charms and paper flowers.

**Normally it is recommended that you apply your Copics first BEFORE paint, pencil or any other mediums, so they won't become clogged. Before you start, you do need to be aware that when using your Copic Markers on some surfaces you need to understand the nib may become blocked by repeated use over paint and you accept that you will need to periodically replace the nib. It is a good idea to have a few Copics that you use ONLY for mixed media work.**


Paint the journal cover with the white Chromacryl acrylic paint - I used 2 coats allowing each to dry before continuing.  Once dry use the fabulous TripleTac glue from X-Press It to adhere your embellishments to the journal cover - allow this to dry thoroughly before continuing.  
This is what mine looks like.

Once dry cover everything with white Chromacryl paint and leave to dry.  You can add a little texture paste for extra interest at this point if you like.


Spray with your favourite sparkly sprays and let dry (this saves a little Copic ink as it adds a base layer of colour, it also adds a little bit of sparkle to the final project).  
Using a Copic airbrush spray BG34 over your cover to colour any light/white areas.

Spray YG25 to about 1/4 of the cover - this can either be randomly or you can choose to colour individual elements.

Still using your airbrush, add V04 to a few places and colour some of the elements eg: flowers or bird - this adds a beautiful contrast to the greens and blues

Add BG49 to darken the colours.

Now this is where things get really interesting!  Using the special properties of Copics and the Copic Blender you can achieve some exciting special effects.  

Before adding any final colours, use a stencil and the X-Press It Clear Gel Glue to apply a design to some of the areas without embellishment.  I also used the Clear Gel Glue to cover some individual elements to highlight them, leave this for several hours or until completely dry.

This results in gorgeous shiny areas (keep reading to see why this is an important step).


Spray BG09 around the edges of the cover - darkening the edges draws your eye to the more colourful area in the centre.  Go ahead and use your airbrush to spray right over the top of the glue design.

Add E47 to the edges and to some of the central designs, again this helps draw the eye.

The final colour E49 is only sprayed on to the very edges, and to the central frame - go ahead and spray this well, getting into all the nooks and crannies.

Use the Copic Blender for the next steps - the special effects!

Using the blender brush tip, remove the excess colour from the top of the gel glue elements (make sure to scribble to colour off your blender in between) - this will reveal the original colour underneath which is paler, creating patterns which POP!

Then use the chisel nib to remove colour from the highest points of some of the textured embellishments eg: frame, bird etc, this will reveal the colour underneath and leave yummy darker colour around it (using this flat nib ensures you only touch the very top of the design - resulting in a beautiful colour contrast - just don't press too hard!).

As a final step flick a little of the Copic Various Blending ink onto your project (I add a few drips onto my fingers and just flick this on) - this will add just a little more texture and interest to the final piece.

 Once all the colour is dry and you have finished removing colour using the Blender your project will look something like this up close, aren't those colours amazing - the Copic ink even blends and layers over paint!

and this is what my finished journal cover looks like....


Products used on this project:

  • Copic Markers: BG09, BG34, BG49, V04, YG25, E47, E49 and Colorless Blender
  • Copic Air Compressor
  • Copic Colorless Blender Various Ink
  • X-Press It: Blending Journal, Clear Gel Glue and TripleTac Glue
  • Chromacryl White Acrylic Paint
  • FabScraps chipboard shapes, lace, watch parts and other embellishments (metal and acrylic)
  • Optional - your favourite sparkly spray as a base - for a matt finish omit this


I just love the amazingly vibrant results achieved with the Copics on this project and the special effects achieved with the Blender make it just that bit more special.  I hope this inspires you to have a go at this technique for yourself, I can promise it is loads of fun and the results as you can see are fairly impressive.

I'd love to hear what you think of my journal cover,  I'd also love to see how you've decorated your Copic Journal covers so why not post a photo of your decorated X-Press It Blending Journal over on the Copic Australia Facebook page.

Kate

Pin It

Wednesday, October 16, 2013

Making Cupcake Toppers


Hello Everyone and welcome to another Copic Oz Tutorial!  Today I'm going to use Flourishes new Pinwheels and Popsicles stamp set to create Cupcake Toppers!!  Such fab projects to add a splash of fun to any celebration!!

Firstly I've started by stamping the ice-cream in Memento Tuxedo Black onto X-press It Blending Card and laid down a base colour of E50.


Then add some shading with E51.


Deepen the shading with E53 and lightly blend with E51.


I like a lot of contrast, so I've deepened the shading even more with E57, once again blend with E53 and E51.


I've made this a strawberry ice-cream and laid down a base of RV00.


Add some shading with RV02 and lightly blend with RV00.


Deepen the shading with RV04 and lightly blend with RV02 and RV00.


For your yummy cherry on top, start with a base of R32.


Add shading with R35.


Deepen the shading with R37.


For more contrast add some R39 and lightly blend with R37, R35 and R32!  I don't blend my reds until I've laid down all the colours.  Reds have a tendency to bleed, so I find it's better to leave the blending until the end.  If you do find the colours start to bleed, at least with this image I'm going to cut it out for the finished project! ;-)


So now that we have a fabulously sweet strawberry ice-cream, what are we going to do with it??  Cut it out, grab a toothpick and a couple of notched tags the same size! 

Stamp the sentiment from Flourishes' Pinwheels and Popsicles onto one and the glue the two tags together with the toothpick in between.  A strong glue like X-press It Clear Gel Glue is perfect!  Fussy cut the ice-cream you've coloured and pop it up on X-press It Foam Tape!


Want to step it up a little?  Why not take a Popstick, create a rosette, a notched tag and a couple of decorative circle shapes!


Glue the popstick and circle to the back of the rosette.  Attach the decorative circles together, fussy cut the ice-cream and stamp the sentiment onto the notched tag and assemble!


Why give your party that added extra fun by creating your own fabulous cupcake toppers and wow your guests (not to mention having a lot of fun preparing as well)! 

I hope you've enjoyed today's tutorial, thanks for visiting and happy colouring!!

Pin It