Wednesday, August 19, 2015

Copic Colourless Blender

Today we are looking at the little miracle that is the Copic Colourless Blender.  In spite of the name, the Colourless Blender isn't really used for blending, instead think of it as your magic wand!  It can fix mistakes, create patterns and texture and add highlights to your colouring.  Today we will be looking at the most common uses for your Colourless Blender.
To try out the following techniques you will need:
  • Copic Colourless Blender
  • Copic Various Ink - Blending Fluid
  • Assortment of Copic Markers
  • Variety of textured materials
  Materials sm

Fixing Mistakes
The Colourless Blender is made to correct mistakes, it contains an alcohol-based fluid that with careful application will fade and in most cases completely remove small areas of Copic Ink, though strong colours are notoriously difficult to completely erase.  To test different colours, create a dark area of colour (this circle is YG09), then using the chisel nib of your Copic Colourless Blender 'push' the ink back towards the black line.  Apply one layer of blending ink and wait for it to dry, before applying more layers.
  Textures 2 sm aThere are about 5 layers of Copic Colourless Blender applied to this area, you can see it's almost gone.

Textures 2 sm a
Creating Dots
All you need to create a fantastic spotted pattern is the brush tip of your Colourless Blender.  Colour your image, this circle is coloured with R37 - then press and hold the brush nib for about 2 seconds on the coloured surface.  For more pronounced dots either hold for a longer period, or go back over previously created dots.
  Textures 10
Creating Bricks
To create a brick pattern all you need is the chisel end of your Colourless Blender. Colour your image, this circle is coloured with BG49 - then press and hold the chisel nib for about 2 seconds on the coloured surface, repeat to create a brick pattern. For a more pronounced pattern either hold for a longer period, or go back over previously created marks.
Textures 6 sm

Creating Fur
To create the texture of fur use a washcloth or a piece of velvet.  Colour your image, this circle is coloured with E59, add some of the Colourless Blender to a mini misting bottle and spray onto the fabric.  The material should be damp - not wet.  Press the material to your coloured image.  You should notice the pattern appearing almost instantly.  If you have missed any areas or want a more pronounced pattern - repeat the above process.
Textures 9 sm
Create Clothing Texture
To create fabulous clothing textures a piece of hessian, denim or lace is perfect.
To create this pattern coloured image using BV08 and then spritz a piece of hessian with Colourless Blending Fluid, press the damp material onto your coloured image.
  Textures 8 sm

To create this material pattern colour your image using RV09, then spritz a piece of denim with the Colourless Blending Fluid, and press the denim onto the coloured shape.  The denim used was quite fine (like on a denim shirt)  if a thicker denim had been used, like jeans denim, then the pattern may have been more pronounced.
Textures 7 sm

To create this lace pattern, colour your image with YG09, then spritz lace with Copic Colourless Blending Fluid - press the lace onto your coloured image and hold for a few seconds.
Textures 4 sm copyHighlights
To create a highlight colour image using Y35 then using the brush nib of the Copic Colorless Blender draw your highlight.  Add a layer of Colourless Blender and allow it to dry so you can see the actual depth of colour removal.  You may need to go over the area 3 or 4 times to achieve the level of colour removal that you want.
Textures 11

More more information on creating texture with the Copic Colourless Blender, have a look at these past posts:
I hope this gives you a few more ideas about how to use your Copic Colourless Blender,

Back with more soon,
KatePin It

Wednesday, August 12, 2015

Refilling Your Markers

If you look after your tools, they will look after you - today we are looking at refilling our Copic Markers!  An easy way to check that your Copic Markers need refilling is when they squeak a lot when colouring or the nib starts going white when you colour and the colour on the page is patchy and uneven. There is a Various Ink refill for every colour in the Copic range (358) so you never need to buy the same colour marker again, simply refill using one of the three methods below. 

TIP - The Various Ink refills can refill your markers (without overfilling) - about 10-12 for Sketch, 15 for Ciao, 8 for Copic and 5-7 for Wide.

There are CC notches on the side of the Various Ink Refills - each mark is one CC.  To refill a Ciao add 1 to 1.5 cc's ink.... Sketch 2 cc's.....Copic 2-3 cc's......Wide 3-4 cc 

Materials
Copic Various Ink
Copic Marker
Copic Tweezers
Copic Booster Needle

 
Method 1 - Drib and Dab
Step 1 - Make sure the numbers on your Various Ink Refill and Marker match. 
Step 2 - Remove the lids of your marker, tip it on a slight angle and add a drop at a time from your refill.  Make sure the previous drop has absorbed into the marker before adding the next.

TIP - You remove both lids so you can see if the marker is overfilled as the excess ink will come out the other end.


Method 2 - Remove Nib and Fill
Step 1 - Remove the nib of you marker - always remove the chisel nib!  Take the Copic Tweezers by placing the teeth low down on the nib and carefully pull out.

TIP - you should never remove the Super Brush nib unless you are planning on replacing as it is more easily damaged.


Step 2 - Once the nib is removed, place the refill bottle directly into the marker and squeeze slightly.  The ink with drip out the end when filled completely.


Method 3 - Booster Needle
Step 1 - Screw the Booster Needle onto the Various Ink Refill.
Step 2 - Put Needle into the marker until you feel resistance. Squeeze to fill.

TIP - It is very important that you clean the Booster Needle after each use to remove any excess coloured ink.  Any remaining ink will contaminate the next marker you refill.  Place the Booster Needle in a container with some rubbing alcohol or Blender Solution to rinse or screw the needle onto a bottle of Colourless Blender and squeeze until the solution flows clear.

There is a PDF flyer available in the Copic Library that can be downloaded and printer for later reference.  You can find that file HERE.


Pin It

Wednesday, July 15, 2015

Testing Papers for Blending

When colouring with Copic Markers, it is important to consider which type of paper to use.  Just as the type of ink can make an impact on your project, so too can paper. You can colour on different types of paper, however you will get vastly different results so it's always good to test your papers before you work on your final project.


Materials
Copic Markers
Copic Multiliner
X-press It Blending Card
Computer Paper
Glossy Photo Paper
Vellum


Step 1 - Testing X-press It Blending Card
Draw a circle with Copic Multiliner and colour in B00 (or the lighter of two blending colours). A good paper should not have any colour moving outside of the lines.


Step 2 - Testing X-press It Blending Card
Flick B02 inwards from one side of the circle (or the darker of two blending colours)


Step 3 - Testing X-press It Blending Card
Where the two colours meet, lightly blend with B00 (or the lighter of two blending colours). A good paper should allow the colours to blend easily together.


Step 4 - Testing X-press It Blending Card
Place the chisel end of the Colourless Blender (0) in the centre of your circle for a few seconds. The result should be a rectangular shape that shows that the colour is moving and look lighter than its surrounds.


Step 5 - Testing Vellum
Vellum is a non-absorbent paper, the colours will look much lighter when applied. The colours will also lift off when changing colours so be careful and scribble excess colour off your nibs. The Colourless Blender will completely remove the colour underneath rather than move the colour.


Step 6 - Testing Glossy Photo Paper
Glossy Photo Paper is also non-absorbent, although the colours look darker than on vellum. Colours will not blend as well as an absorbent paper and the Colourless Blender does not work very effectively.


Step 7 - Testing Computer Paper
Computer Paper is a thin absorbent paper and after laying down the colours, you may find ink seeping outside the lines as this paper oversoaks quickly. Use a lighter hand when colouring on Computer Paper.


Pin It

Tuesday, July 14, 2015

How to Get The Most Out of Your Copic Multiliners

In the last blog post, Kathy talked about finding the perfect ink to use with your Copics, well today I'll be looking at the perfect pens!  If you would like to experiment with your current pen collection, you can perform all the same Copic compatibility tests with pens, that Kathy talked about with inks.  Let me save you some time though -  hands down the BEST pens to use with your Copic markers are the Copic Multiliners.

Copic Multiliners come in 2 body styles  
the Multiliner
101_ml
and the Multiliner SP.  
Copic-multiliner-sp


Both styles have:
  • Copic safe ink - so you can colour  over the ink without damaging your Copic Markers
  • Wide array of colours and coordinating coloured packs available
  • Variety of sizes and styles of nib including: 0.03 mm, 0.05 mm, 0.1 mm, 0.3 mm, 0.5 mm, 0.8 mm, 1.0 mm and Brush 
  • Ink is archival, acid free, fade resistant and waterproof on most porous surfaces
Msp10alw

The biggest differences between are:
  • The Multiliner is cheaper and disposable, but for a little extra you can buy the Multiliner SP which is refillable (so will save you money in the long run).
  • The Multiliner SP is available in a wider range of colours and you can change the nibs (so if you are a bit heavy handed, no problems, just swap out the nib when it starts to get ratty).
  • The Multiliner SP also has a cool metal barrel which is lovely to hold!

Pen-Feature-MLSP

HOT TIPS:
  • Multiliners are great for embellishing a stamped design or filling in any areas of a stamped image that have mis-stamped.
  • Multiliners are not recommended for use over waxy substances (crayon or pencil), the wax may prevent the ink from drying creating smears and can clog your nib
  • Copic Multiliners are permanent on many surfaces once dry, heat-set the ink to be certain.
  • Multiliners work beautifully over watercolours, producing a consistent even line

Not sure how to use Copic Multiliners in your art?  Then here is a little inspiration....

Mixed Media Squares


Stendoodling with Copics

Posted by Kate PalmerPin It

Wednesday, June 17, 2015

Testing Inks

When creating a project with Copic, one of the most important things to consider is the type of ink you use for your line work. Because there are so many ink formulations, it is always a good idea to test your ink before you commit to using it on a project.


Materials
Copic Marker
Copic Multiliner
Ballpoint Pen
Memento Ink
StazOn Ink
X-press It Blending Card
Step 1 - Testing Copic Multiliners:
Draw a line with a Copic Multiliner onto X-press It Blending Card and place a light coloured Copic Marker next to, but not on, the line.
Step 2 - Testing Copic Multiliners:
Over soak the paper and make the Copic ink move over the line drawn with a Multiliner. A good ink, like the Copic Multiliner will not move or bleed.

Step 3 - Testing Ball Point Pens:
Repeat the first two steps using a bad ink, such as a ballpoint pen, will move when using the testing ink steps as outlined above.
Step 4 - Testing Memento Ink: 
When stamping, or using another ink type, use the same procedure. Stamp the image, place the Copic Marker next to, but not on the line and oversoak the paper. Memento Ink as used in this picture will not move and therefore is a good ink to use with Copic Markers.

Stamped Image by Power Poppy
Step 5 Testing Stayzon Ink: 
Stamp an image in Stazon Ink and oversoak the paper following the above steps. This will result in the ink moving. StazOn Ink is a solvent ink and is not suitable to use with Copic Markers as they are alcohol ink.

Stamped Image by Power Poppy.
Post by Kathy Jones

Pin It

Monday, June 1, 2015

The Copic Airbrush System

Today we are looking at the Copic Airbrush system or ABS for short.  The Copic ABS (Airbrush System) allows you to use your Copic Sketch or Original markers in new and exciting ways and provides an easy and relatively inexpensive way take your Copic art to the next level!

Materials:


The Copic ABS is extremely simple to use, just attach the Airgrip to the Aircan (or compressor), insert the chisel tip of your Copic Original or Sketch marker into the Airgrip and press the trigger to deliver a steady and even colour across porous or non-porous surfaces!  To change colours just swap one marker for another.  Why do you need an ABS or compressor - well to create beautiful even backgrounds, graded colours, amazing blends and it actually uses LESS ink than normal colouring!


If you are new to airbrushing then Copic has several starter kits available, ABS1-N, ABS-2, ABS-3 - more information is available on the Copic ABS flyer.  I'd recommend the COPIC Marker Airbrush Kit #1 – as this versatile kit includes: Airgrip, Air Can 180 (about 45 mins of air time),  Air Adapter, Air hose, and a handy can holder. Everything you need to create airbrush art with your COPIC markers! This  kit also has everything you need if you decide you LOVE airbrushing and want to upgrade to an air compressor in the future (which is why I'd recommend this particular kit). Though you will need to make sure your new compressor comes with a hose, as the air hose included in this kit isn't suitable.

1_53677_FS


Here are a few quick exercises to help you better use your new Copic ABS system, whether you are using an Aircan or a compressor.


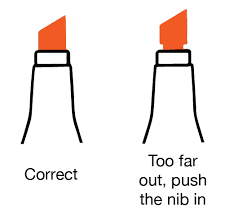
Make sure your marker nib is not pushed too far in or too far out.


Spray Close to the Card 3-4cm - from left to right quickly, fast = light


Spray Close to the Card  3-4cm - from left to right slowly, slow = darker


Spray At a Distance (15cm) from the Card = a finer spray


The trigger is pressure sensitive and will create different effects according to the pressure used.

Give it a try - press trigger down 1/2 way = lighter colour


press all the way down = darker colour


The ABS is pure magic when used with Stencils or Masks.  I've created this using  X-Press Graph-X Stencil Sheets (these have an adhesive backing so give a super crisp result).  Spray your ink from a distance, moving slowly back and forth over the card to achieve a smooth and even result.


HOT TIPS:
  1. Airbrushing uses LESS ink than direct colouring since saturating the paper isn't necessary.
  2. Don't shake or lay aircans on their side while in use.
  3. If your aircan gets too cold (happens after about 90 seconds spraying) then your spray may become splotchy or the airflow may be reduced.  Just wait for a minute or so, until your air can warms back up!
  4. Begin by starting with a light spray.......... you can always add more colour, but you can't take it off
  5. If your project begins to feel tacky you have added too much ink (this will happen more quickly on non-porous surfaces).  To combat the tacky feeling, carefully spray your project with a fixative - make sure it's non-alcohol based or the fixative will react with your Copic ink!
  6. Ensure your marker is aligned vertically with the nozzle - if it's off to one-side or the other your spray pattern will be off.
Have fun using your Copic ABS system, though fair warning it's rather addictive!

Back next month with more,
Kate

Pin It

Tuesday, May 5, 2015

Going Green!


Hello Everyone!! Today's tutorial is looking at greens - in particular colouring leaves! Anyone who has followed my work would know how much I love colouring floral images, so of course leaves are an essential piece of this. So let's have a look and see how today's image came together......

Start by stamping your image - I've used Simply Camellias by Power Poppy - in Memento Tuxedo Black onto X-press It Blending Card.

In the Copic family there is a huge selection of greens to choose!  Whether you want soft spring greens, deep greens, bold and bright greens or muted grey-greens, you will find a great combination to suit your project.  Today I've used what would probably be my favourite green combination - G40, G43, G46, G99.  I just love the hues of this combo!

Lay down the base colour of G40.....


Then add some detail using the next darkest colour, in this case G43, particularly along the veins of the leaves......

Deepen the shadow areas with G46 (make sure you get on the underside of the leaves that would be blocked from the light)......

Go back with your next lightest colour (G43) and flick out from where you've added the G46.....

Then lightly go back with G40 (your lightest colour) over the edges of your previously coloured parts.  You don't have to colour over the entire leaf, the parts that you leave will stay light which will give you more contrast and interest.  You can repeat these last two steps until you are happy with the result.

When you blend with your lighter colours, you sometimes loose the depth from your darkest colour, so go back to add the contrast - I like to use G99 to really add some interest.

Then to make your leaves look a little less 'perfect' add a touch of E21 to parts of the leaves (it doesn't have to be much).  I really like the effect this gives.

Finish colouring your image in your preferred colours!!

I've used......
Flower - R00, R11, R12, R14, Y17
Bowl - C1, B0000, B000
Leaves - G40, G43, G46, G99, E21

Create your card!  You can find more details about how I made the card itself on my blog.

Hope you've enjoyed today's tutorial and you're inspired to colour some beautiful foliage yourself!!
Happy colouring
Kathy

Pin It